

Auto-scheduling fills your required shifts for you. Instead of dragging every shift onto an employee by hand, you mark which shifts are required, choose what you want to optimise for and Shiftbase’s AI proposes a complete schedule. You review it and apply it with one click, or discard it and try again. Nothing is ever published to your employees automatically.
Contents
What auto-scheduling does and doesn’t touch
What the AI takes into account
Auto-scheduling step by step
1. Open the auto-schedule panel
2. Check: are you ready to schedule?
3. Review the forecast (optional)
4. Choose what to optimise for and generate
Find the best fit for a single shift
How availability and absences are used
Requirements
You’ll need a few things in place:
- A Premium plan*. Auto-scheduling is a Premium feature.
- The “Add schedules” permission for the department you’re scheduling.
- At least one required shift in a team in the department and date range you want to fill. Required shifts are the staffing needs the AI tries to cover. If you haven’t marked any shifts as required for the period, there’s nothing for auto-scheduling to do. See Working with required shifts to set these up.
📝 Note: A quick mental model of what happens: Shiftbase gathers your required shifts, your employees and their availability, any approved absences, and your account’s scheduling rules, then asks the Auto-scheduler to find the best way to assign people to shifts. You always get a draft to review first.
*For now, early access available in premium plans.
What auto-scheduling does and doesn’t touch
It helps to know the boundaries before you run it:
- Required shifts are filled. Every shift you’ve marked as required with a fixed start- and end time for the department and period is sent to the auto-scheduler, which tries to fill each one.
- Other shifts are left alone. Open or required shifts (without a fixed start- and end time) that aren’t marked required are never changed.
- Shifts already assigned stay put. If an employee is already assigned to a shift before you draft a schedule, that assignment stays fixed and the rest of the schedule is drafted around it. If you want the Auto-scheduling to reconsider an already-assigned shift, unassign it first, then start a new draft. To check a single shift without re-running the whole week, use Find the best fit instead.
- One department per draft. Auto-scheduling covers one department at a time, for the week you’re currently viewing. To schedule two departments, run it once for each.
📝 Note: Auto-scheduling only reads your availability and absence data. It never creates, edits, or approves absences, and it never publishes the schedule to employees. Those stay separate, manual steps.
What the AI takes into account
When it builds your draft, the solver considers:
- Required shifts for the department and week (the demand it’s trying to cover)
- Employee availability and unavailability
- Approved absences
- Contract hours and how many hours each employee is already scheduled for
- Plus/min (overtime) balances
- Skills, matched to the skills a shift needs
- Your account’s scheduling rules
Run auto-scheduling step by step
1. Open the auto-schedule panel
Go to Schedule, select the department and the week or month you want to fill, then click the Auto-Schedule button in the toolbar.
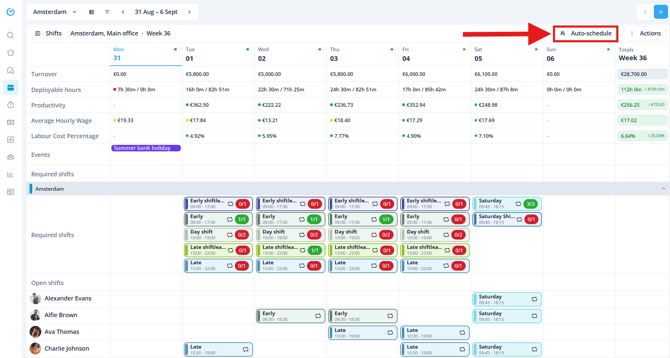
The panel opens as a short wizard with up to four steps: Check, Forecast, Strategy, and Schedule. (Forecast only appears if you have permission to view it.)
💡 Tip: A run covers one week or one month: the week you’re viewing on the schedule. Set the date before you open the panel.
2. Check: Ready to schedule?
The first step is a quick readiness check of the data and settings auto-scheduling relies on. Each item shows whether it’s ready or needs attention, so you can fix issues for a better result or continue anyway.
You’ll typically see:
- Required shifts — whether you’ve planned required shifts for the week.
- Skills — whether skills are assigned to shifts and employees.
- Hourly wages — whether wages are set for your employees (used when optimising for cost).
- Availability — how many employees have submitted their availability.
- Settings — whether your auto-scheduling settings are configured.
Anything that needs attention shows a Set up link that takes you straight to the right place to fix it, and a summary at the bottom tells you how many things could improve the result. Resolve what you can and come back, or click Continue to proceed with what you have.
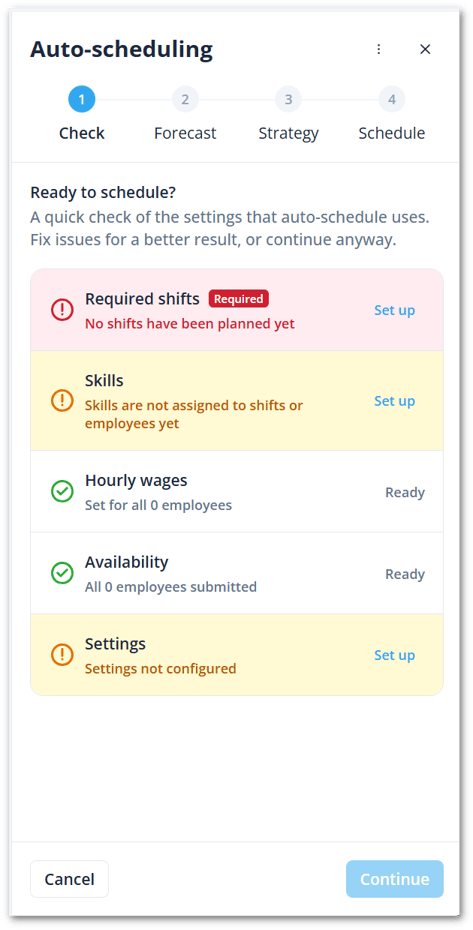
💡Tip: None of these are mandatory, you can always continue anyway. But the more that are ready, especially required shifts, availability, and skills, the more complete and useful your draft will be.
3. Review the forecast (optional)
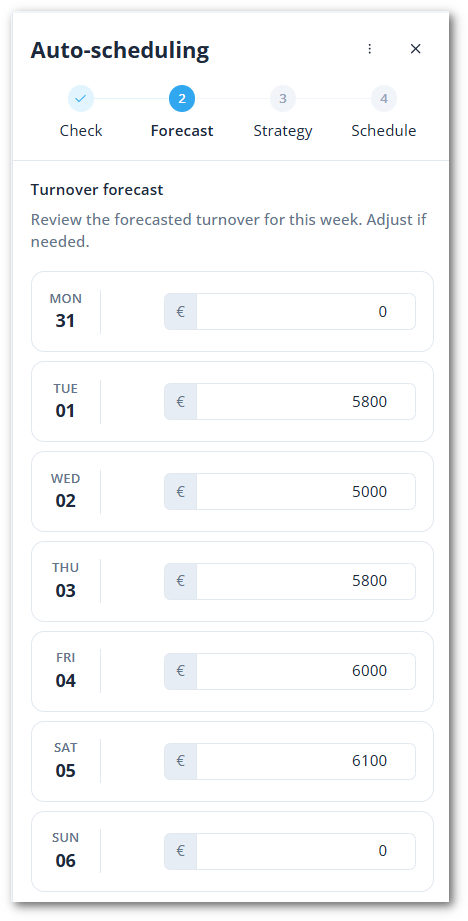
If you have permission to view it, this step shows the forecasted turnover for the department and week. Use it to sanity-check that your required shifts line up with expected turnover. If you don’t have forecast access, this step is skipped.
4. Choose what to optimise for and generate
Pick an optimisation goal
- Profit: Minimises labour cost.
- Balanced: A balanced mix of cost, coverage, and fair distribution of hours.
- Employee: Prioritises employee preferences and satisfaction.
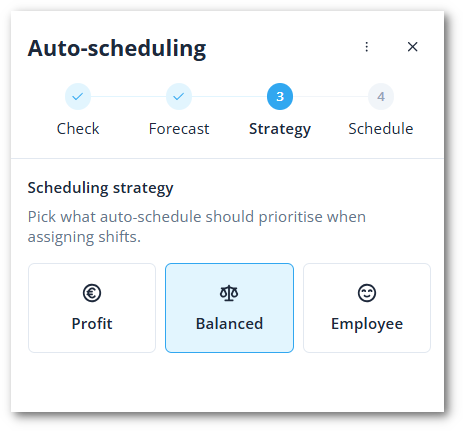
Then click Draft schedule to continue.
📝 Note: While a draft is generating, the department is locked for editing, and you’ll see a “Drafting your schedule” indicator.
Generating usually takes from a few seconds up to a few minutes, depending on the size of the department and all factors to concider.
You don’t need to wait on the panel: carry on with other work and come back to review the draft when it’s ready.
5. Review the draft
When the auto-scheduler finishes, you get a draft proposal. The proposed schedule is now displayed!
Nothing has been saved to your live schedule yet. The draft state is indicated on the top the schedule.

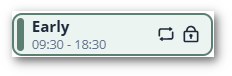
Any shift added to the schedule before the generated schedule like repeating shifts, will be marked with a lock-icon. This means that this scheduled shift cannot be altered by the auto scheduler.
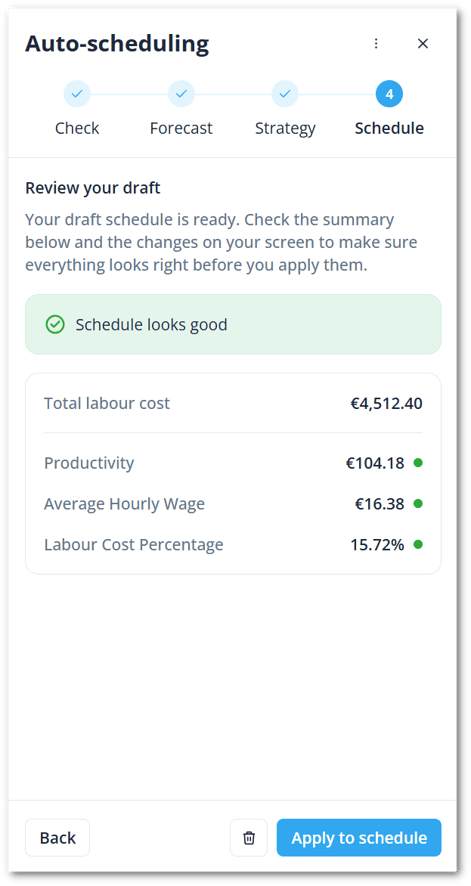
In the auto schedule windows, there are a couple of items to review before applying, a summary shows the key figures for the proposed schedule.
- Total labour cost: Estimated total labour cost of the proposed schedule.
- Productivity: The amount of revenue generated for every hour worked by your employees.
- Average hourly wage: Average hourly wage across the scheduled employees.
- Labour cost percentage: Labour cost as a share of expected turnover.
Alongside the summary, the changes are shown on your schedule itself (what would be added), together with any required shifts that stayed unfilled, shown in the unassigned row.
6. Apply or discard
- Apply writes every proposed shift to your live schedule right away. The schedule refreshes, and the proposed shifts become normal shifts, indistinguishable from ones you created by hand. Applying is all-or-nothing for that proposal, and there’s no single “undo” afterwards.
- Discard throws away the draft only. It does not affect your forecast or your required-shift definitions. You can adjust your setup and generate a fresh draft.
⚠️ Caution: An applied schedule cannot be reversed. If you want to change something after applying, edit the shifts the normal way.
Applying does not publish the schedule to your employees. Publish it as you normally would when you’re ready for them to see it.
💡 Tip: Want a different proposal?
Running the exact same setup can produce slightly different results, because several equally good schedules can exist for the same inputs. Discard and generate again, or change the optimisation goal, to explore alternatives.
Find the best fit for a single shift
In some cases, you need to fill a required shift for only a few employees. Instead of re-running the auto schedule, Shiftbase can recommend the best fit.
Open the required shift and click on the ✨ Recommendations tab. Here, you will find employees who are recommended. Click on the Why? button to see reasons why this employee is recommended.
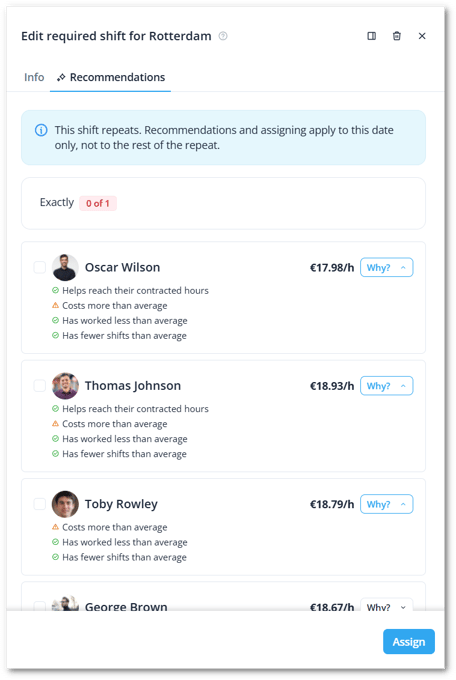
You can apply a recommended employee to the shift directly from the list. The schedule stays a draft until you publish it.
📝 Note: Find the best fit works on one shift at a time and draws on the run that generated your draft, so it doesn’t re-solve the week.
Settings
Auto-scheduling follows a set of account-wide rules you control under Settings > Schedule > Auto-Scheduling.
These apply to every department, and changes only affect future runs, not a draft that’s already generated.
| Setting | Default | What it does |
|---|---|---|
| Maximum weekly hours | 50 hours | No employee is ever assigned more than this many hours in a week. |
| Maximum flex weekly hours | 40 hours | A separate weekly cap for employees on flexible or zero-hour contracts. |
| Maximum extra weekly hours (fixed contracts) | 0 hours | How many hours beyond their contract a fixed-contract employee may be assigned in a week. At 0, they’re never scheduled beyond their contracted hours. |
| Maximum hours per day | No limit | Optional daily hours cap per employee. |
| Maximum shifts per day | No limit | Optional daily shift-count cap per employee. |
| Availability handling | Soft | Whether stated available times are a strict requirement (Hard) or a preference the solver tries to honour but may override (Soft). |
| Unavailability handling | Hard | The same choice for times an employee marked unavailable. Defaults to strictly respected. |
| Treat days with no availability info as unavailable | Off | Off: a blank day counts as available. On: a blank day is treated as unavailable and the employee won’t be scheduled that day. Useful if your employees don’t reliably fill in availability. |
| Team preference | Hard | Whether an employee can only be assigned within their own team(s) (Hard) or the solver may cross team boundaries. |
📝 Note: Settings are account-wide, so you can’t give one department a 35-hour cap and another a 40-hour cap at the same time. If you truly need different limits, adjust the setting between runs (you already run each department separately).
How availability and absences are used
Employees set their availability in the mobile app, the web calendar, or the employee-management screen. Auto-scheduling reads their availability, approved absences, and preferred hours when it builds a draft. If someone is unavailable during a shift the AI is trying to fill, that shift goes to someone else or stays unfilled in the unassigned shift row.
FAQ
-
Fulfillment is below 100%, but I thought every shift was coverable. Usually availability, weekly-hour caps, or the “treat blank days as unavailable” setting removed candidates. Check the unassigned-shifts list, confirm no one is already at their weekly cap, and check whether the affected employees have simply never filled in availability for those days (this matters if the blank-day setting is on).
-
The AI keeps assigning the same person. Within your rules, that may genuinely be the best answer, others may be excluded by availability, team membership, or hour caps. If you used the Profit goal, leaning on the cheaper employee is expected. Try the Balanced or Employee goal, or review the other employees’ availability and caps for that period.
-
I ran the same thing twice and got different schedules. That’s expected. Several equally valid best schedules can exist for the same inputs, and the solver may return either. It isn’t a bug.
-
The cost figures don’t match my payroll. The review screen estimates cost from the proposed shifts using your current rates at the time of review. It doesn’t account for no-shows, later manual edits, breaks and unpaid time, bonuses, or special rates, and it updates if your rates change between generating and reviewing. Actual payroll will differ once the schedule plays out.
-
My draft disappeared / my proposed shifts didn’t save. A draft is only saved when you click Apply. If you clicked Discard, closed the panel, or closed the browser before applying, the draft is gone. Run auto-scheduling again and make sure you click Apply.
-
Can I set different rules per department? Not today. Settings are account-wide. The workaround is to run auto-scheduling separately per department (which you already do, since each run covers one department) and adjust the settings between runs.
How auto-scheduling relates to other features
- Required shifts are essential. Auto-scheduling has nothing to fill unless shifts are marked required for the team and department.
- Copy Schedule is the manual alternative. Use Copy for stable, repeating schedules; use auto-scheduling when demand varies, and you want the system to optimise around your rules.
- Forecast is optional input. If view forecast permission is on, the first step can help you decide which shifts should be required, but auto-scheduling works fine without it as long as required shifts are marked.
- Absence and availability feed the solver but stay separate. Auto-scheduling reads approved absences and availability and never creates, edits, or approves them.