❗Caution: Make sure you've checked out our article on how to set up time off balance expiration for your account before you proceed. This article explains how you setup a generic new balance with expiration active.
⚠️ Important Notice:
If you feel unsure or uncertain about the migration steps, please do not start the migration. Reach out to our support team with your question or uncertainty instead, and one of our agents will be able to help you further by answering your questions about the steps described in this article.
We are aware that this is a great new feature and also requires an accurate migration to ensure your absence data stays correct.
Please first read the entire article, and if you are in doubt about any steps, please contact the Support Team with your question.
Introduction
This article is intended for customers looking to start utilizing absence balance expiration to start managing statutory & non-statutory absence balances. In this article we will be walking you through the steps to migrate from an existing absence balance system without expiration to a system with balance expiration for the years to come.
We therefore have documented two methods to do so. This is due the possibility of you, the customer, being in current situation than others.
Please pick below the chapter about the method that represents your current absence balance setup.
Content
Method 1: Customer with two existing absence balances
Method 2: Customer with one existing absence balance
Method 1: Customer with two existing absence balances
This method is for you, if currently you manage your vacation already with two absence balances in Shiftbase representing statutory & non statutory.
If you currently only manage your vacation with one balance follow Method 2: Customers with one existing absence balance instead.
Step 1: Backup your Data - first
- We strongly advise you to create backups of your absence balances through our Reports for the years that will be migrated before starting the migration process. You can do so by:
- Going to Reports in Shiftbase.
- Select Time Off and select Balance Summary.
- Enter the correct date. Example: You are looking to setup balance expiration as of 01-01-2025 - you now want to backup your current balances on the date 31-12-2024. Download the report and save it on your device.
- Going to Reports in Shiftbase.
Step 2: Disable Integration
❗Tip: If you assume not finishing this within 1 day, and you are utilizing an integration that supports automatic employee import, we strongly advise you to deactivate the integration for the time being until all following steps are completed.
Step 3: Activate Expiration
- Navigate to Settings > Absence > Balances and edit the statutory time off balance.
- Enable Expiration and decide after how many months or years the balance expires after the accrual year.

- Do the same for the non-statutory balance.

- Enable Expiration and decide after how many months or years the balance expires after the accrual year.
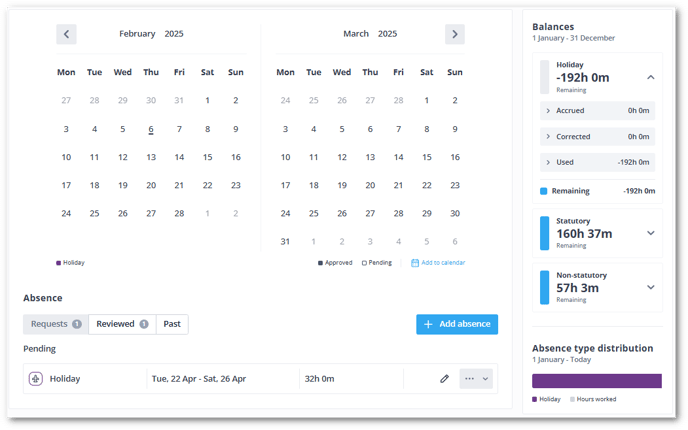
- After the Expiration is activated and there are expiring absence hours for employees, you will find a yellow information field, indicating when and how many hours are to expire.

Step 4: Activate the automatic balance selection
- To make sure that the balance with the earliest expiration is first used up when requesting a holiday, you must enable Autoselect balance. With this setting, you guarantee that the statutory balance is used first because they expire sooner. If the statutory balance is depleted, the non-statutory will be used.
- Navigate to Settings > Absence and edit the regarding Absence policy.
- At the Policy configuration level, you can edit the absence type Holiday and enable Autoselect balance.


- After the above is applied, you will notice that whenever you request time-off, you cannot select the balance anymore. This will now be taken care off automatically.
- This is the old situation.

- This is the old situation.
-
- This is the new situation.

- This is the new situation.
Method 2: Customers with a single Absence Balance
This method is for you, if currently you manage your vacation with one singular absence balance in Shiftbase representing. If you currently you manage your vacation with two balances, follow Method 1: Customers with two existing absence balances instead.
Step 1: Backup your Data first
- We strongly advise you to create backups of the absence balances through our Reports for the years that will be migrated before starting the migration process. You can do so by:
- Going to Reports in Shiftbase.
- Select Time Off and select Balance Summary.
- Enter the correct date. Example: You are looking to setup balance expiration as of 01-01-2025 - you now want to backup your current balances on the date 31-12-2024. Download the report and save it on your device.
- Going to Reports in Shiftbase.
Step 2: Disable Integrations
❗Tip: If you assume not finishing this within 1 day, and you are utilizing an Integration that supports automatic employee Import, we strongly advise you to deactivate the integration for the time being until all following steps are completed.
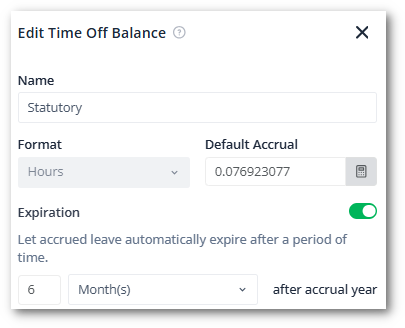
Step 3: Rename old Balance & set accrual to zero
-
Edit the “Default Accrual” of the old balance and set to zero (“0”)

Step 4: Create new Absence Balances
- Create a new Statutory Absence Balance
- Example 20 days (160 hours)
- Set up Expiration (for example to 6 months).
- Create a new Non-statutory Absence Balance
- Example 5 days (40 hours).
- Set up Expiration (for example 5 years).

- This is how your balances should look like after the steps detailed above.

Step 5: Create new Absence Policies
- Edit the old absence policies currently in use and rename them to old.

- Create a new Absence policy (for each policy you are migrating) utilizing the new balances for each Contract Type.
- Edit the absence type: Holiday by clicking on the pencil icon, enable the two new balances and enable Autoselect balance.

- This is how it should look like.

- Edit the absence type: Holiday by clicking on the pencil icon, enable the two new balances and enable Autoselect balance.
Step 6: Create new Contract Type(s)
- Edit and rename the old contract types
- Create a new Contract type(s) utilizing the previously configured Absence policies for each Contract type currently in use and to be used after migration.

Step 7: Bulk Action - Change Contract
-
Through Bulk actions: Change contract change all contract types (old) as of 01.01.2025 to the new equivalent contract type created in Step 6 - do this action for every contract type that needs to be migrated. Use the Filter in the top right to only select a specific contract type to work more secure and prevent errors.
-
Manually edit any employee that started after 01.01.2025. Since the Bulk Action is looking at the Contract start date, there is no easier way to deal with employees activated past 01.01.2025. These contract types you have to manually change in the tab of the Employee under Contracts.

-
Step 8: Bulk Action - correct Balances
If you have remaining leave from 2024 you have to decide which amount is statutory and which amount is non-statutory. After you've determined which amount is statutory or non-statutory, you can correct this into the new Absence balances.
- Through Bulk Actions: Correct balance, move the values from the old balance to the two new balances, splitting the remaining amounts like you decided to do
- Balance: select the old balance
- Date: put the date on the date before the new contracts, in our example 31.12.2024
- Action: select the Option Change balance to and select the new balance that you created before
- Per Employee, you can now enter the to-be-deducted amount that will move into the new balance in the table below per employee - Non-statutory
- Select Change at the bottom of the page to move the values from the old balance to the new balance
- Do this step again if you also have a remaining balance going to the other new balance - e.g Statutory

Step 9: Recalculate Balances
- For each employee, open the Contract tab in the employee's menu, and edit by clicking on the pencil icon the newly created contract created through the previous Bulk-action. In the contract set all the accrual rates of the old balances to the correct factor (=0) by clicking on the Recalculate Icon. This is why we set the default accrual to zero, on the old leave balances and new balances in Step 3. Do the same with the new balances and set them to the appropriate accrual by clicking on the Recalculate Icon.

Step 10: Check Employee's Balances
- Check all employees balances after this, if the old balance is still shown in 2025 and has a negative balance, this is your signal an existing vacation request in 2025 is still connected to the old balance in our example Holidays and needs to be edited and switched to the balance as of 2025.